Affinity Designer - Using Multiple Artboards

Now that BellaOnline has a mobile friendly responsive layout, we have a new policy for feature images for each article post. This feature image not only displays at the top of the article but also on Facebook and other networks. It’s all automatic now and the only thing the editor needs to do is create the image to the required specifications. In this tutorial, we will create a template for this feature image in Affinity Designer and learn how to use multiple artboards.
It didn’t take long before I realized that I needed a template, containing design elements that are used for each feature image, such as copyright text. Also, this template could have other reusable graphic elements, including several backgrounds images and computer/devices with blank screens that work like Photoshop smart objects. Let’s get started.
It didn’t take long before I realized that I needed a template, containing design elements that are used for each feature image, such as copyright text. Also, this template could have other reusable graphic elements, including several backgrounds images and computer/devices with blank screens that work like Photoshop smart objects. Let’s get started.
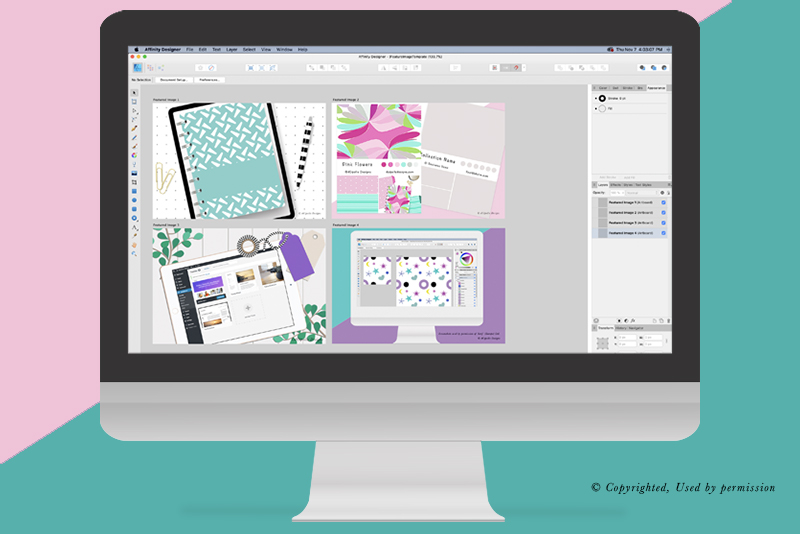
- Open Affinity Designer and click File - New (see screenshot). As this will be a web image, let’s use the default Web preset. But we will change the Width to 800 pixels and the Height to 534 pixels. We also need to check the box for Create Artboard.
- In the Layers panel, double-click the name and add the new layer/artboard title (see screenshot). You will see the name changed on the Pasteboard and in the Layers panel.
- With the first artboard selected, click Edit - Duplicate from the top Menu Bar, to duplicate the artboard (see screenshot).
- In the Layers panel, rename the second artboard to Featured Image 2.
- Repeat the previous steps to create two more artboards.
- In the Layers panel, drag the layers to reorder them as you like (see screenshot).
- From the Menu Bar, click File - Save. Name the document FeatureImageTemplate and save it in the default .afdesign file format (see screenshot).
This will give us one artboard on the Pasteboard (see screenshot). Let’s zoom out a little so that we will have more space for multiple artboards. But first, let’s rename the artboard in the Layers panel to Featured Image 1.
The second artboard will be added on top of the original. Drag the second artboard to the right.
At this point, we are ready to add a different background image and design elements to each artboard. Let’s save the document.

Related Articles
Editor's Picks Articles
Top Ten Articles
Previous Features
Site Map
Content copyright © 2023 by Diane Cipollo. All rights reserved.
This content was written by Diane Cipollo. If you wish to use this content in any manner, you need written permission. Contact Diane Cipollo for details.


